

Homemade Finger Paint with Glitter
.JPG)
It's been awhile since we've whipped up a batch of our favorite finger paint recipe! We love making our own paint recipes and experimenting with added texture and different ingredients. We've added Kool Aid to finger paint to give it a yummy scent, and last fall we made finger paint using real Starburst candy. Now that my toddler twins are a bit older I'm confident that they won't try to taste our homemade paint which means they are ready for sparkly finger paint! Let's face it, everything is more fun when it sparkles. My friend Vicky at Mess for Less had the same idea this week! She made glitter finger paint for her sweet girls, and check out her bubbling glitter paint as well. How cool is that?
.JPG)
How to Make Sparkly Finger Paint
This post contains affiliate links. Here is my full disclosure policy.
Supplies:
- 2 cups cold water
- 1/2 cup cornstarch
- 3 tablespoons sugar
.JPG)
I usually mix our finger paint in my Vitamix. It can also be made on the stove top. If you have a Vitamix combine the water, corn starch, and sugar and mix on high for about six minutes until the mixture is thick. To cook on a stove top combine the water, corn starch, and sugar in a saucepan and cook on medium, stirring constantly with a whisk. Heat until it is thick.
.JPG)
I think this should be pretty obvious, but just in case I want to be sure to mention it. The paint will be very hot. Do not let your children touch it before it has time to cool all the way through. I highly recommend testing it yourself being allowing children to paint.
.JPG)
Separate the paint base into smaller containers and add color. I used liquid watercolors. The amount of color you add is a personal preference. The more color you add the more vibrant the paint will be. Then I sprinkled each color with the corresponding color of glitter. My friend Asia and Fun at Home with Kids has been telling me for almost a year that I need to try the plastic glitter from Discount School Supply. I kept putting off buying it, because I wanted to use up our current stash. I finally ordered some a couple months ago, and oh boy is she right! It is the best glitter ever, and we will never use any other.
.JPG)
Sometimes as the finger paint cools it becomes a bit clumpy. When this happens I add a tiny bit of water while mixing in the color and stir well. Don't add too much water, because you don't want it to be runny.
.JPG&container=blogger&gadget=a&rewriteMime=image%2F*)
I covered our picnic table with butcher paper and set out the sparkly finger paint and invited Tank and Peanut (33 months) outside to paint.
.JPG)
They love finger paint. I don't know if it's the texture or the lack of brushes, but finger painting captivates their attention longer than any other painting project.
.JPG)
Of course the sparkle added that extra pizzazz!
.JPG)
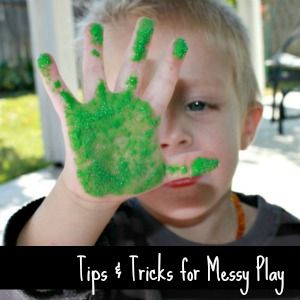
Don't let the messy aspect of finger painting scare you! Here are tips for messy play as well as laundry tips to avoid stains and keep clothes bright. The benefits of sensory play far outweigh the mess.
.JPG)
This finger paint recipe will dry nicely if it isn't took thick on the paper. We tend to focus on the whole process and embrace the sensory aspect of finger painting, so the butcher paper ends up in the trash when we are through painting.
.JPG)
The finger paint will keep for a few days in an air tight container in the refrigerator. If it is stiff and clumpy when you pull it out, whip it with a hand mixer for a minute to get it light and fluffy again before painting.
.JPG)
I love that the weather is heating up, because once Peanut and Tank were done painting I filled up a small bin with water, and they washed themselves and the containers off in it and played happily for another hour, scooping and pouring the water.
.JPG)
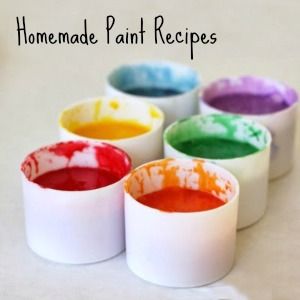
For more homemade paint recipes follow me on Pinterest.
.JPG)
More Finger Paint Recipes:
.jpg)
.JPG)
.jpg)


I always visit your blog everyday to read new topics
ReplyDeleteBrilliant idea! We have been inspired to include this craft idea in our blog post 'It’s a GIRL Thing ……. 8 Inspiring Craft Ideas'. You can find a copy of the blog post here - http://www.billylids.com.au/blog/item/18-it%E2%80%99s-a-girl-thing-8-inspiring-craft-ideas.html Thank you Penny @ Billy Lids
ReplyDeleteCould you mix it in a food processor or stand up mixer?
ReplyDeleteYes, but I'm not sure if they would get hot enough. A Vitamix will actually cook things when left to run long enough.
DeleteWe were taught to make this at Teachers College about 30 years ago...the only type of paint (or glue) we used as acrylic paint was too expensive. We used boiling water & mixed it with a wooden spoon in a large bowl -good exercise for the arm muscles :) Great for colourful collage as it acts a paint & glue in one, & can be made stronger for bigger items with the addition of some white glue(wood glue) Keeps well covered in the fridge.
ReplyDelete