

Easy art projects for kids - Erupting Watercolor Paint

I'm thrilled to be kicking off an art series called Easy Art Projects for Kids. My kids will be exploring different art mediums and ways to create, and I will be sharing the process twice a month along with several of my favorite bloggers! Our first theme is exploring watercolors. Since my boys love absorption art with liquid watercolors I decided to put a spin on a classic by making erupting watercolor paint. The boys had so much fun with our erupting flour paint and erupting sidewalk chalk paint, so I knew they would love erupting watercolor absorption art. This activity is suitable for toddlers on up, but I have to say my six year old got into it the most.

How to Make Erupting Watercolor Paint
This post contains affiliate links. Here is my full disclosure policy.
Supplies:

Directions: A few of our favorite watercolor absorption art projects include fireworks, Easter eggs, and turkeys. The typical process for glue and salt absorption art is to make designs using school glue then cover them with salt shaking off all the excess. Slowly drip liquid watercolors or colored water onto the salt covered glue and watch the color as it is pulled through the glue. It spreads quickly and is cool to watch.

Instead of straight salt I used equal amounts of salt and baking soda to make our erupting absorption art.

The boys didn't seem to notice that the texture was different than normal. They love each step of the process from creating glue designs to shaking on the salt to adding the color and watching it spread.

Please note: Designs with lines work better than large pools of glue. I reminded JZ (6) of this, but he really wanted a large area of glue in his design. It was his artwork and therefore his choice.

I love the fine motor skill building aspect of this project. Both squeezing glue and pinching the pipettes strengthen the muscles needed for holding a pencil properly.

As always they added more color than necessary. I didn't stop them, since they enjoy the creating process, but I mention it just so you know that the ideal process is to add the color slowly and allow it to be pulled through the glue and salt.

I used watercolor paper for this project, and in addition to adding color to the glue designs JZ loved sprinkling color directly onto the paper.

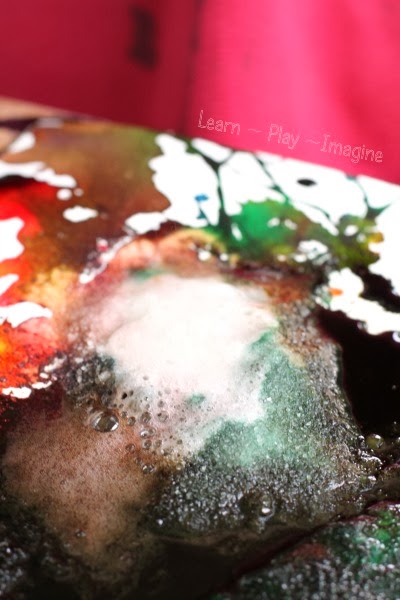
Once the boys were satisfied with their designs I pulled out a surprise. I had vinegar ready to be squeezed onto the watercolor paint with the pipettes.
I squeezed glue onto another sheet of papers in straight lines, so the boys could see the full process of the color pulling through the glue. JZ helped me add color. We used two different colors on each line to watch them mix and blend when they met in the middle. In some instances they mixed to form a secondary color. In other cases the two colors stopped each other short. It was quite fascinating.

Once again JZ was excited to add vinegar to the watercolors and make them erupt.


Be sure and check out all the ways to explore watercolors!
Texture on Watercolor Projects from Blog Me Mom
Exploring Absorption with Watercolors on a Texture from Fun at Home with Kids
Pour Painting with Watercolors from Housing a Forest


So cool! Definitely going to TRY!
ReplyDeleteCan't believe I finally found a craft I hadn't heard of! Thank you thank you thank you! Fab pictures ! Can not wait to do this with my 6 year old :)
ReplyDeleteSuper idea!
ReplyDeleteWhat did it look like after it erupted and dried out?
ReplyDeleteThis was really fun! We used food coloring. Thanks for this idea!
ReplyDelete